
There are several methods to attempt when it comes to printing blank t-shirts, hoodies, and other clothing. There is screen printing, embroidery, and tie-dying. The list is endless. But a lot of individuals have discovered that dealing with heat transfer vinyl, or HTV, offers the best advantages. You may apply almost any pattern on fabric and, of course, other substrates with HTV. A computer, a vinyl cutter, an iron, and a few standard crafting tools are all you need to get started. You don’t really need any specialized knowledge or abilities, and you can make gorgeous patterns right away.
You may want to consider purchasing or upgrading to a heat press machine whether you are new to utilizing heat transfer vinyl or have some expertise but have been using an ordinary home iron. In terms of operation, heat presses are comparable to irons, but they have a number of advantages. They apply pressure more consistently, transfer designs more quickly, and regulate temperature more precisely than irons. And although while they may appear a little scary at first, they’re actually more simpler to operate than you may imagine. Learn how to use a heat press for t-shirts, sweatshirts, and more as you read on at dtfvirginia.com!
What is a heat press machine?
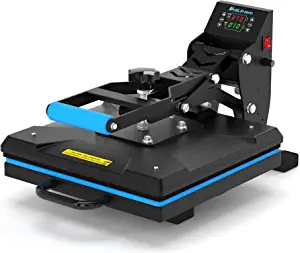
A heat press machine is made to pressurize and heat a material for a predetermined period of time. Although they are more frequently used with textiles, there are specialized machines for mugs, hats, plates, or caps.
There are a number of automated machines that will remain closed at the pressure you specify for the time you set, as well as manual heat presses where you directly manage the pressure and duration. We’ll discuss the differences in utilizing either in greater depth later. I’ve used both.
Steps to Use a Heat Press
1. Select your press
You must locate the ideal press for you as the initial step in your trip. It’s vital to thoroughly research your choices before establishing a t-shirt business. A larger press allows you the opportunity to cover a complete t-shirt, whilst a smaller one may only be great for particular designs. Similar to this, you could wish to print on a greater variety of goods; in this situation, a versatile machine may come in very handy.

The difference between home presses and professional presses, however, is the most significant one. Although the former is primarily designed for private use, you can use it for a firm that is just getting started. A professional press is a preferable option if you already handle large orders or intend to go to mass manufacturing. Larger platens are included, and there are additional pressure and temperature options.
2. Select your source
Unfortunately, you can’t press with any old cloth. Some of them are heat-sensitive, and hot temperatures might cause them to melt. Avoid using synthetics and thin fabrics. Print instead on lycra, spandex, nylon, polyester, and cotton. These fabrics can survive heat pressing, while others require you to check the label.

Pre-washing your clothing is an excellent idea, especially if it is brand new. After the first wash, certain creases may develop and may have an impact on the pattern. You can prevent such problems if you do this before pushing.
3. Select your style
The enjoyable part of the procedure is this! Almost every picture that can be printed may also be applied to clothing by pressing. But if you want your company to really take off, you need a unique idea that will catch people’s attention. Improve your abilities using programmes like CorelDraw or Adobe Illustrator. By doing so, you’ll be able to pair a clever concept with a lovely visual illustration.

4. PRINT YOUR ARTWORK
The transfer paper is a crucial component of the heat pressing procedure. Your design is originally printed on a sheet that has more pigment and wax. It is positioned in the press over your clothing. Depending on the type of your printer and the color of your material, there are several types of transfers. Here are a few of the most typical.
Inkjet prints: Make sure you acquire the right paper if you use an inkjet printer. The fact that inkjet printers cannot print white is significant. Whenever there is a white area in your design, that area will appear as the color of the garment after it is heat pressed. In order to get around this, pick an off-white hue.
Transfers using a laser printer: As previously indicated, different types of paper are required for various printers, and they are not interchangeable, so make sure you choose the appropriate one. It is believed that laser printer paper produces somewhat worse results compared to inkjet paper.

Sublimation transfers: This paper is more expensive since it requires special ink and sublimation printers, which are more expensive. Here, the ink transforms into a gaseous condition that seeps into the cloth and permanently stains it. However, it only functions with polyester-based textiles.
Pre-made transfers: Another choice is to purchase pre-printed graphics that you just insert into the heat press without having to perform any printing yourself. Even embroidered designs with heat-sensitive adhesives on the reverse may be attached using a heat press.
There are a few things to keep in mind while using transfer paper. One of the most fundamental is to print on the proper side. Although it sounds straightforward, it’s simple to misunderstand.
Print a mirror picture of the image that appears on your computer screen as well. In the press, this will be reversed once again, giving you the precise design you intended. You should normally test-print your design on a plain piece of paper to see if there are any errors before using transfer paper; this will save you money.
A coating film holds designs printed on transfer paper, especially when using inkjet printers, in place. It is white in color and covers the entire page, not just the pattern. This film is also transmitted to the material when you heat press the design, which may leave tiny traces all around your picture. If you wish to prevent this, cut the paper as precisely as you can around the pattern before pressing.
5. PREPARE THE HEAT PRESS
Regardless of the heat press machine you’re using, operating it is simple to understand. You may set the pressure and temperature you want as well as the timing on any heat press machine. When it is being prepared, the press should be accessible.
Set your temperature after turning on your heat press. To achieve this, spin the thermostat knob in a clockwise direction (or, on certain devices, use the arrow buttons) until you reach the appropriate heat setting. The heating light will turn on as a result. You’ll know it’s at the desired temperature when the light turns off. At this point, you can turn the knob back, but the light will continue to cycle on and off to maintain the heat.
You don’t use the same temperature for pressing at all times. You may find instructions for setting your transfer paper on the package. Don’t worry if this appears high; it should be for the design to stick well. This will typically be approximately 350-375°F. To test the press, you may always find an old shirt.

Set the pressure after that. As you turn the pressure knob, adjust it to the desired position. When applying pressure, thicker materials often need more, whilst thinner ones don’t.
In any situation, you should strive for medium to high pressure. To find the level that you believe produces the finest results, it is best to experiment a little.
6. PLACE YOUR GARMENT IN THE PRESS
When putting the material into the press, it is crucial to straighten it. A terrible print will result from any folds. To get rid of wrinkles, you can pre-heat the clothing in the press for 5 to 10 seconds.
Additionally, stretching the garment before putting it in the press is a good idea. By doing this, the print will slightly compress once you’re done, decreasing the likelihood that it may break in the future.

Make sure the side of the garment that will bear your print is facing upward. The t-shirt tag ought to be positioned such that it faces the press’s back. This will aid in properly positioning the print. To help you coordinate your pattern, some presses can beam a laser grid onto your clothing.
Your embroidered design should be adhered with the sticky side down, and your printed transfer should be placed face-down on the garment. Although you don’t need to do this if your press includes a protective silicone pad, you can lay a towel or a small piece of thin cotton fabric on top of the transfer as protection.
7. TRANSFER THE DESIGN
You can lower the handle after properly positioning the clothing and print within the press. You shouldn’t need to physically press the top for it to lock. According on the directions on your transfer paper, set the timer for between 10 and one minute.
Open the press once the time has elapsed and remove the shirt. While the transfer paper is still warm, peel it off. You should now be able to see that your design has been successfully embroidered onto your clothing.
If you’re producing more shirts, you may now repeat the procedure for fresh garments. Put a cardboard inside the shirt first if you want to add a print to the side that has already been printed.
8. CARE FOR YOUR PRINT
Before washing your clothing, give it at least 24 hours to rest. This aids in the print setting. Turn the item inside out before washing it to prevent friction. Use mild detergents instead than harsh ones since they won’t damage the print. Air drying is preferred over using a tumble dryer.
Tips & Things to avoid
- Avoid washing too quickly. The adhesives in your material will take some time to set, especially if you’re using vinyl. If you can, give it at least 24 hours!
- Don’t use a heat setting that is too high. So there is a nice medium when you use just the correct amount of heat, but your settings are much too high if you notice your heat press smoking or if your t-shirts are becoming a burned yellow. If anything is incorrect, focus more on the outcomes and less on the settings because not all pushes are well calibrated.
- Take caution when selecting your fabric. You can encounter difficulties if you try to operate with anything that is waterproof or extremely thin. Nothing beats working with cloth when you’re just starting out. Since almost all machines are calibrated and created for cotton, you may be sure that, at the very least, the issue is not with the fabric and go on to troubleshooting it.
- Properly load the machine and design. Before you start the timer, take your time to make sure the design is positioned appropriately. If you take a little more care, your outcomes will be considerably better.
- Pay attention to test prints. Before ordering large quantities of a new material, always do a test to evaluate how it performs. The same advice applies if you’re trying a new technique: prepare a test, wash the material many times, and ensure everything worked out as expected. I do this with every present I create in order to have a chance to remedy them if things go wrong before it’s too late!
How do I set the temperature and time on a heat press machine?
Begin by turning on the heat press machine and allowing it to reach the desired temperature, as indicated by the manufacturer’s instructions or the type of material you’re using.
What type of materials can I use with a heat press machine?
Heat press machines can be used with a variety of materials including:
- Cotton, polyester, and blends
- Nylon
- Spandex
- Linen
- Canvas
- Leather
How do I properly prepare my design or artwork for heat pressing?
Begin by creating or selecting a design using graphic design software or obtaining pre-made designs.
What are the recommended pressure settings for different materials?
Consult the manufacturer’s instructions or conduct a test to determine the optimal pressure setting for your specific material and design.
Can I reuse transfer paper or do I need to use a new sheet for each press?
Transfer paper typically cannot be reused for multiple presses.
CONCLUSION
We hope this has persuaded you if you were on the fence about expanding your printing business concept. Pressing a pattern onto any surface is quite easy, and you can use it to both express your creativity and earn money.
Despite variations in design, size, and utility, all heat presses share comparable mechanics. There are other alternatives to the methods for heat pressing a cap, shirt, and mug that you have seen. You may concentrate on jigsaw puzzles, ceramic plates, tote bags, pillowcases, or even plates.
You would be wise to look into this issue more as there are undoubtedly advancements in every industry. The best transfer paper may be purchased in a variety of ways, and each type of surface has its own design guidelines. However, you will be happy you took the time to learn how to utilize a heat press.