Hello there, reader! We’re thrilled to have you here as we unlock the secrets to achieving clear, untinted windows with this comprehensive guide, designed and curated by industry-leading professionals. Our mission is to make your DIY journey enjoyable, easy, and ultimately rewarding. Let’s get right into how to remove tint from windows?.
Why Remove Window Tint?

Window tint serves its purpose by providing privacy, protecting against harmful UV rays, and helping to maintain a cooler environment. But, everything has its shelf life, and window tint is no exception. It may start to bubble, fade, or peel off over time, making it unsightly. That’s where removing window tint becomes a necessary and useful skill.
Can I Remove Window Tint Myself?

Absolutely! DIY window tint removal is an accessible process that you can undertake at your convenience. It’s a cost-effective alternative to professional window tint removal services. This guide will walk you through various window tint removal techniques that are tested and recommended by experts.
Tools Needed for Window Tint Removal

Before you dive into removing the tint, gather these basic tools:
- Hairdryer or a heat gun
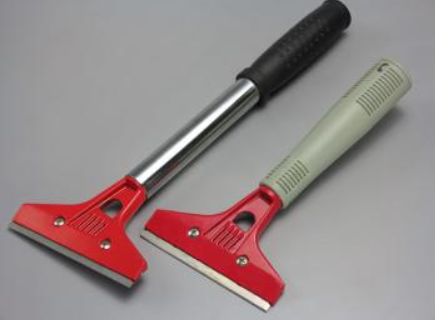
- Razor blade or a scraper
- Dish soap or window cleaner
- Paper towels or cloth
- Spray bottle
It’s time to get your hands dirty!
Removing Tint from Car Windows
Are you worried about removing tint from car windows without causing any damage? We’ve got you covered!
- Apply Heat: Start by warming up the tinted window from the outside using a hairdryer or a heat gun. Make sure to hold it about two inches away from the window to avoid overheating and potentially damaging the glass.
- Peel off the Tint: Once you notice the edges of the tint starting to curl, carefully use a razor blade or scraper to peel off the tint. Maintain a steady hand to ensure you don’t scratch the glass.
- Deal with the Residue: After removing the tint, there might be some residual adhesive left on the window. Create a soapy solution with dish soap and water in a spray bottle and apply it generously on the residue. Let it sit for a few minutes before scraping it off with the razor blade.
- Clean and Dry: Finally, clean the window thoroughly with a window cleaner to remove any remaining soapy solution or adhesive. Dry the window with a paper towel or cloth to achieve a clean, glossy finish.
Tackling Tint on Home Windows

While the steps for removing tint from home windows are similar to those of car windows, you might have to deal with larger surfaces, requiring a little extra care and patience.
- Heat: Start by applying heat to the tinted surface as explained before.
- Peel: Use a scraper or razor blade to peel off the tint. If the surface is large, you might need to do this in sections to ensure effective removal.
- Remove Residue: The same soapy solution can come to your rescue here. Spray it on, let it sit, and scrape off the residue.
- Clean and Dry: Clean with a window cleaner and dry thoroughly to complete the process.
Potential Challenges
How do I deal with stubborn tint adhesive?
Sometimes, the tint adhesive refuses to budge. In such cases, a fine steel wool with soapy water can be used to scrub off the residue. Always use it gently to avoid scratches.
Are there risks to defroster lines when removing tint?
Yes, there are. When dealing with rear car windows, the defroster lines can get damaged if not handled correctly. The trick here is to use more heat and less force when peeling off the tint.
Common Mistakes to Avoid
While removing window tint is a straightforward process, there are some common mistakes to watch out for:
- Impatience: It’s crucial to take your time with the process. Rushing can lead to unnecessary scratches or incomplete removal.
- Not Cleaning Properly: After removing the tint, ensure to thoroughly clean the windows to remove all adhesive residues.
- Ignoring Safety Measures: Always use tools carefully to prevent any injuries or damages.
Legal Restrictions
Laws regarding window tinting vary from place to place. It’s advisable to check your local regulations before starting the process. However, generally, removing tint doesn’t involve any legal implications.
Remember, this guide was carefully put together by professionals who have your best interests in mind. Your trust in our expertise is appreciated and never taken for granted.
Window Tint Removal Techniques
Our journey to the perfect untinted windows continues. We’re glad to have you with us, ready to delve deeper into the art of removing window film. You’ve learned the basics, but there’s always more to discover, especially with our professionals leading the way.
When is the Best Time to Remove Window Tint?
As any seasoned DIY-er would know, timing is crucial in home improvement projects. For window tint removal, the ideal time is during warmer months. The heat aids in loosening the adhesive, making the process smoother.
However, if you need to undertake the task in colder weather, don’t worry! Your trusted hairdryer can replicate the effect of natural heat.
Advanced Techniques
We’ve covered the basics, but for those stubborn tints that resist the standard approach, here are some advanced techniques.
Using a Steamer
A fabric steamer can work wonders for removing tint from car windows or home windows. The steam penetrates the film, making it easier to peel off. This method is particularly effective for aged or sun-baked tints.
The Ammonia Method
If you’re not averse to stronger cleaning agents, ammonia can be an effective tool. However, this method requires caution because of the strong fumes. Here’s how you can use it:
- Cut a garbage bag into the shape of the window.
- Spray ammonia generously on the inside of the tinted window (for vehicles, make sure to protect the interior).
- Stick the cut garbage bag to the window with the ammonia. The bag helps to hold the ammonia against the window tint.
- Leave the window under direct sunlight for about an hour.
- Afterward, peel off the tint with a scraper. The heat and ammonia together should help in removing the tint smoothly.
Please remember to use gloves and a face mask to protect yourself from the strong ammonia fumes. Additionally, ensure the area is well-ventilated.
Removing Tint Residue
Despite your best efforts, sometimes there’s sticky residue left after the tint is peeled off. Here’s how you can tackle that:
- Soapy Water and Razor: As discussed before, a razor blade and soapy water usually work effectively in removing tint adhesive.
- Rubbing Alcohol: If the residue persists, rubbing alcohol can help. Soak the residue with it, let it sit for a few minutes, and then wipe off with a cloth.
- Goo Gone: This is another useful product that can help remove adhesive residue. Make sure to follow the instructions on the product.
Professional Window Tint Removal
While DIY is the economical way to go, there are professional window tint removal services available for those who prefer it. These services guarantee a clean, damage-free removal due to their expertise and specialized equipment. It might be worth considering if the tint is especially stubborn or if the windows are particularly sensitive.
Safety Precautions
While our guide makes the process sound easy, safety should always be your first priority. Always wear protective gloves when handling sharp tools and chemicals. In case of accidental injury, seek immediate medical attention.
Also Read: SSR Movie (SSR Movies)
Final Word
Removing window tint is an involved process but one that brings significant satisfaction when done correctly. With the right tools, proper techniques, and a bit of patience, you can restore your windows to their original, untinted glory.
The world of DIY awaits you! Let the sense of accomplishment fuel your excitement for future projects. Remember, with every task you take on, you’re becoming a more skilled and confident homeowner. At the end, we hope this guide about “How to Remove Tint from Windows?” clear all your queries related to the topic. Happy tint removing!

Aretha Davis, the wordsmith extraordinaire, weaves enchanting tales with her pen and keyboard. A renowned blogger and writer, her captivating prose transports readers to realms unknown. Join her literary journey and be swept away by the magic of her words.
